A properly installed Earth Pit is essential for electrical safety and lightning protection. Over time, corrosion, soil conditions, or loose connections can reduce its effectiveness. Testing the Earth Pit resistance using a digital earth tester ensures your grounding system is reliable and safe.
Why Testing Earth Pit Resistance Is Important
Confirms low-resistance grounding for safe electricity flow
Detects faults, corrosion, or degraded soil conditions
Ensures compliance with safety standards for residential and industrial setups
Standard Resistance Values:
Residential: < 5 Ohms
Industrial or High-Risk Areas: < 1-2 Ohms
Tools Required
Digital Earth Tester (Clamp-On or 3-Point)
Auxiliary electrodes (for 3-point testing)
Measuring tape
Safety gloves and equipment
Testing Methods
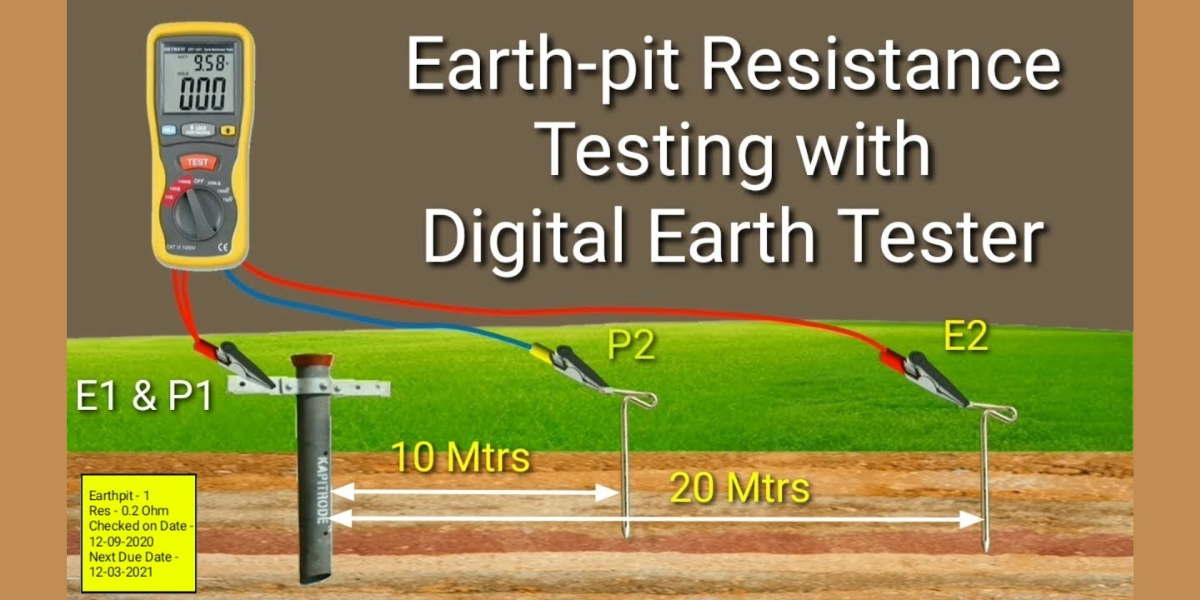
1. 3-Point Fall-of-Potential Method
Place the current probe and potential probe at specified distances from the Earth Pit.
Connect the digital tester to the Earth Pit and probes.
Take multiple readings for accuracy.
Best for new installations and detailed inspections.
2. Clamp-On Earth Tester Method
Quick and convenient method without disconnecting the Earth Pit.
Clamp the tester around the Earth Pit conductor.
The device automatically calculates resistance.
Ideal for routine maintenance checks.
Step-by-Step Procedure
Ensure the Earth Pit and surrounding area are accessible.
Connect the tester probes according to the chosen method.
Take multiple readings for accuracy.
Compare readings with standard resistance values.
Record results and schedule maintenance if resistance exceeds recommended limits.
Tips for Accurate Measurement
Test in both dry and wet soil conditions to ensure reliability.
Keep distance from metallic structures that may interfere with readings.
Use corrosion-resistant electrodes for auxiliary probes.
Maintain a log for periodic testing and inspection.


